The two local storage mechanisms in HTML5, 'LocalStorage' and 'SessionStorage' are really nifty when you need to store the data temporarily but don't want to involve any server side interaction.
I wanted to create a small HTML-form page which would allow user to enter data in various fields and on submitting the form, just show the data submitted in a text-format (easy for copy-paste). And if needed allow the data to be edited by repopulating the data in the fields.
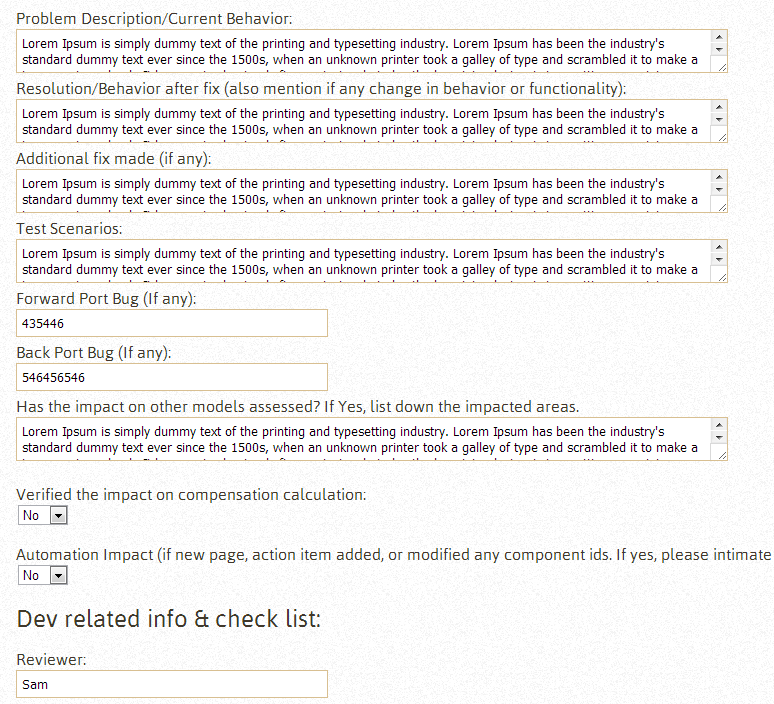
Something like this:

On submitting, the entered data shows up like this:

On reloading the page, once again we get the first page with data populated in the fields. Pretty cool eh?
I decided to use sessionStorage for this. Idea is very simple (and you will notice that implementation is as simple!).
Before starting with sessionStorage or JS code, let's take a look at the form HTML code:
<form id="bct" >
<label>Problem Description/Current Behavior:</label>
<textarea name="problemDescription" id="problemDescription" class="stored" value=""></textarea>
<label>Resolution/Behavior after fix (also mention if any change in behavior or functionality):</label>
<textarea name="resolution" id="resolution" class="stored" value="" ></textarea>
<label>Additional fix made (if any):</label>
<textarea name="additionalFix" id="additionalFix" class="stored"></textarea>
<label>Test Scenarios:</label>
<textarea name="testScenarios" id="testScenarios" class="stored"></textarea>
</form>
Note the 'class' attribute for the textboxes and textareas. We will use jQuery to get hold of all the components using this attribute. (If you are not very comfortable with jQuery, don't worry. It's not mandatory to use jQuery. It is just hell lot easier!)
When entering the values in any of the form fields we set the values in sessionStorage in attributes with corresponding names. So the following JS function is called on blur event for each field which has 'stored' as class.
$('.stored').blur(function () {
sessionStorage[$(this).attr('name')] = $(this).val();
});
What this code is doing that for each element with class='stored', on the blur event it picks the value of attribute 'name' (e.g. testScenarios) and creates a sessionStorage attribute with this value and stores the value of the field in this attribute.
So once you have entered values for all the above fields 'problemDescription', 'resolution', 'additionalFix' and 'testScenarios' we will have sessionStorage attributes named 'problemDescription', 'resolution', 'additionalFix' and 'testScenarios' with values same as those entered in the form fields.
Step two is getting the data on click of submit button, which you may have rightly guessed that is nothing but displaying the data contained in these sessionStorage attributes we just populated.
I created another div and hid it, only to be shown on the click of Submit button. In this div, there are placeholders for each data field which we will populate through another JS function, which is called on click of Submit button. Note the class of these elements is 'results'.
<div class="results" style="display:none;">
<div>=============================================</div>
<div class="resultHeader">Problem Description/Current Behavior:</div>
<div id="problemDescription_results" class="results"></div>
<div>--------------------------------------------</div>
<br/>
<div class="resultHeader">Resolution/Behavior after fix (also mention if any change in behavior or functionality):</div>
<div id="resolution_results" class="results"></div>
<div>--------------------------------------------</div>
<br/>
<div class="resultHeader">Additional fix made (if any):</div>
<div id="additionalFix_results" class="results"></div>
<div>---------------------------------------------</div>
<br/>
<div class="resultHeader">Test Scenarios:</div>
<div id="testScenarios_results" class="results"></div>
<div>----------------------------------------------</div>
</div>
Following function is called on the click of a button whose id is 'submit' and it hides the element whose id is 'bct', in our case the form (note that it's id is 'bct') and unhides the elements whose class is 'results'.
1. $('#submit').click(function() {
2. $('#bct').fadeOut("slow");
3. $('.results').fadeIn("slow");
4. $('#problemDescription_results').html(sessionStorage["problemDescription"]);
5. $('#resolution_results').html(sessionStorage["resolution"]);
6. $('#additionalFix_results').html(sessionStorage["additionalFix"]);
7. $('#testScenarios_results').html(sessionStorage["testScenarios"]);
And lines 4-7 set the innerHTML of the divs with the given id with sessionStorage attribute with corresponding name and thus the value is populated in the page!
Now the last requirement of repopulating the form with the values on reloading the page. On page load we check for the value of sessionStorage attribute. If it is not null, we set the attribute value as the value of the component!
function init() {
if (sessionStorage["problemDescription"]) {
$('#problemDescription').val(sessionStorage["problemDescription"]);
}
if (sessionStorage["resolution"]) {
$('#resolution').val(sessionStorage["resolution"]);
}
if (sessionStorage["additionalFix"]) {
$('#additionalFix').val(sessionStorage["additionalFix"]);
}
if (sessionStorage["testScenarios"]) {
$('#testScenarios').val(sessionStorage["testScenarios"]);
}
}
I wanted to create a small HTML-form page which would allow user to enter data in various fields and on submitting the form, just show the data submitted in a text-format (easy for copy-paste). And if needed allow the data to be edited by repopulating the data in the fields.
Something like this:
On submitting, the entered data shows up like this:

On reloading the page, once again we get the first page with data populated in the fields. Pretty cool eh?
I decided to use sessionStorage for this. Idea is very simple (and you will notice that implementation is as simple!).
Before starting with sessionStorage or JS code, let's take a look at the form HTML code:
<form id="bct" >
<label>Problem Description/Current Behavior:</label>
<textarea name="problemDescription" id="problemDescription" class="stored" value=""></textarea>
<label>Resolution/Behavior after fix (also mention if any change in behavior or functionality):</label>
<textarea name="resolution" id="resolution" class="stored" value="" ></textarea>
<label>Additional fix made (if any):</label>
<textarea name="additionalFix" id="additionalFix" class="stored"></textarea>
<label>Test Scenarios:</label>
<textarea name="testScenarios" id="testScenarios" class="stored"></textarea>
</form>
Note the 'class' attribute for the textboxes and textareas. We will use jQuery to get hold of all the components using this attribute. (If you are not very comfortable with jQuery, don't worry. It's not mandatory to use jQuery. It is just hell lot easier!)
When entering the values in any of the form fields we set the values in sessionStorage in attributes with corresponding names. So the following JS function is called on blur event for each field which has 'stored' as class.
$('.stored').blur(function () {
sessionStorage[$(this).attr('name')] = $(this).val();
});
What this code is doing that for each element with class='stored', on the blur event it picks the value of attribute 'name' (e.g. testScenarios) and creates a sessionStorage attribute with this value and stores the value of the field in this attribute.
So once you have entered values for all the above fields 'problemDescription', 'resolution', 'additionalFix' and 'testScenarios' we will have sessionStorage attributes named 'problemDescription', 'resolution', 'additionalFix' and 'testScenarios' with values same as those entered in the form fields.
Step two is getting the data on click of submit button, which you may have rightly guessed that is nothing but displaying the data contained in these sessionStorage attributes we just populated.
I created another div and hid it, only to be shown on the click of Submit button. In this div, there are placeholders for each data field which we will populate through another JS function, which is called on click of Submit button. Note the class of these elements is 'results'.
<div class="results" style="display:none;">
<div>=============================================</div>
<div class="resultHeader">Problem Description/Current Behavior:</div>
<div id="problemDescription_results" class="results"></div>
<div>--------------------------------------------</div>
<br/>
<div class="resultHeader">Resolution/Behavior after fix (also mention if any change in behavior or functionality):</div>
<div id="resolution_results" class="results"></div>
<div>--------------------------------------------</div>
<br/>
<div class="resultHeader">Additional fix made (if any):</div>
<div id="additionalFix_results" class="results"></div>
<div>---------------------------------------------</div>
<br/>
<div class="resultHeader">Test Scenarios:</div>
<div id="testScenarios_results" class="results"></div>
<div>----------------------------------------------</div>
</div>
Following function is called on the click of a button whose id is 'submit' and it hides the element whose id is 'bct', in our case the form (note that it's id is 'bct') and unhides the elements whose class is 'results'.
1. $('#submit').click(function() {
2. $('#bct').fadeOut("slow");
3. $('.results').fadeIn("slow");
4. $('#problemDescription_results').html(sessionStorage["problemDescription"]);
5. $('#resolution_results').html(sessionStorage["resolution"]);
6. $('#additionalFix_results').html(sessionStorage["additionalFix"]);
7. $('#testScenarios_results').html(sessionStorage["testScenarios"]);
And lines 4-7 set the innerHTML of the divs with the given id with sessionStorage attribute with corresponding name and thus the value is populated in the page!
Now the last requirement of repopulating the form with the values on reloading the page. On page load we check for the value of sessionStorage attribute. If it is not null, we set the attribute value as the value of the component!
function init() {
if (sessionStorage["problemDescription"]) {
$('#problemDescription').val(sessionStorage["problemDescription"]);
}
if (sessionStorage["resolution"]) {
$('#resolution').val(sessionStorage["resolution"]);
}
if (sessionStorage["additionalFix"]) {
$('#additionalFix').val(sessionStorage["additionalFix"]);
}
if (sessionStorage["testScenarios"]) {
$('#testScenarios').val(sessionStorage["testScenarios"]);
}
}
Wasn't it simple? And jQuery made it simpler.
Comments