So you have read white papers, blogs and even some books on what is Big Data and how it is transforming world by giving us insights into the data usage through advanced analytical strategies. You might also have read about Hadoop and Map/Reduce.
But now what? How do you begin? Theory is not going to cut it, right? You want to get your hands dirty and write some code and setup some clusters, right? Right. So let's start.
Admittedly, Hadoop is intimidating. Apart from having a plethora of software (first of all, you need a Linux box!) you also need to have a 'cluster' of machines because Hadoop running on one machine is not really what a real life Hadoop installation looks like. As a beginner you would like to quickly write a 'Hello World' of Hadoop rather than setting up environment.
Easiest way to start instantly is using Cloudera's Quickstart VM for Hadoop.(Cloudera is one of the three biggest Hadoop distributors). First of all we need to install a virtualization software like Oracle Virtual Box or VMWare. Cloudera's Quickstart VM gives you a CentOS (a Linux distribution) installation with entire suite of Hadoop software along with 'Cloudera Manager' which is a browser based tool to manage these software.
Download and install Oracle VM VirtualBox from here. Once you are done, download Cloudera's Quickstart VM for Oracle VM VirtualBox from here.
Start VirtualBox and click on File->Import Appliance and select the Quickstart VM you just downloaded. It will ask you to assign some RAM, hard disk, processors and location for snapshot (C:\Users directory by default). Ideally 6-8 GB RAM, 20-40 GB HD and minimum of 2 cores are required.
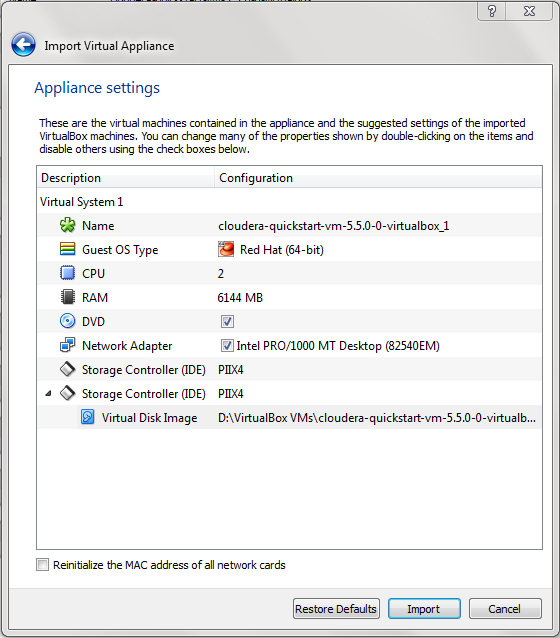
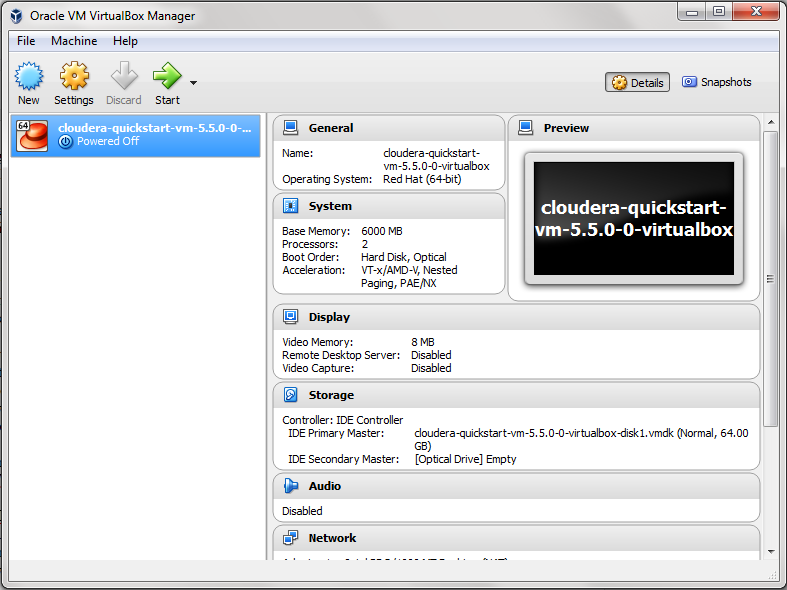
It will take a few minutes. Once it is done, you will get this screen:


But now what? How do you begin? Theory is not going to cut it, right? You want to get your hands dirty and write some code and setup some clusters, right? Right. So let's start.
Admittedly, Hadoop is intimidating. Apart from having a plethora of software (first of all, you need a Linux box!) you also need to have a 'cluster' of machines because Hadoop running on one machine is not really what a real life Hadoop installation looks like. As a beginner you would like to quickly write a 'Hello World' of Hadoop rather than setting up environment.
Easiest way to start instantly is using Cloudera's Quickstart VM for Hadoop.(Cloudera is one of the three biggest Hadoop distributors). First of all we need to install a virtualization software like Oracle Virtual Box or VMWare. Cloudera's Quickstart VM gives you a CentOS (a Linux distribution) installation with entire suite of Hadoop software along with 'Cloudera Manager' which is a browser based tool to manage these software.
Download and install Oracle VM VirtualBox from here. Once you are done, download Cloudera's Quickstart VM for Oracle VM VirtualBox from here.
Start VirtualBox and click on File->Import Appliance and select the Quickstart VM you just downloaded. It will ask you to assign some RAM, hard disk, processors and location for snapshot (C:\Users directory by default). Ideally 6-8 GB RAM, 20-40 GB HD and minimum of 2 cores are required.
It will take a few minutes. Once it is done, you will get this screen:
Click on 'Start' button and once the VM is ready you will see this.

Click on 'Launch Cloudera Express'. Follow the instructions. Open the URL for Cloudera Manager in the browser. Congratulations, you have setup your Hadoop 'Learning' Environment successfully!
You will see various services in stopped status. Go ahead and start HDFS, YARN and HUE (in this order and others later).

Click on Hue and go to Hue home page and click on Hue Web UI. You can now interact with various Hadoop services using a web interface (HUE stands for 'Hadoop User Experience' which gives you a UI alternative to command line.)

Click on 'File Browser' on top right side of the page. Explore the file browser and try the various actions available. Play around. Give yourself a pat on the back!
I will be back with next steps in Part 2.
Comments